Get RabbitMQ credentials
To be able to accept jobs and enable production in your Pulsar endpoint, you need to get RabbitMQ credentials, which allows you to get jobs from the main pool.
In this step will be described how to make this request to the UseGalaxy.eu server administrators to create a new RabbitMQ account for your Pulsar endpoint.
Warning
You don’t need to edit any files not detailed here. Some of the files will be updated/modified by Galaxy administrators before your PR is merged. All files are indented by spaces. Do not use any tabs.
Pull request on GitHub
In order to retrieve the RabbitMQ credentials from usegalaxy-eu team, a Pull Request on their Infrastructure Playbook repository is manadatory
Note
In this tutorial we will use vim as default editor. Please, if necessary replace it with the one you prefer.
Note
We will call this test deployment test01-pulsar.
Fork the usegalaxy.eu GitHub repository Infrastructure Playbook repository.
Locally clone the forked repository:
git clone git@github.com:<your user name>/infrastructure-playbook.git
Navigate in the infrastructure-playbook directory:
cd infrastructure-playbook
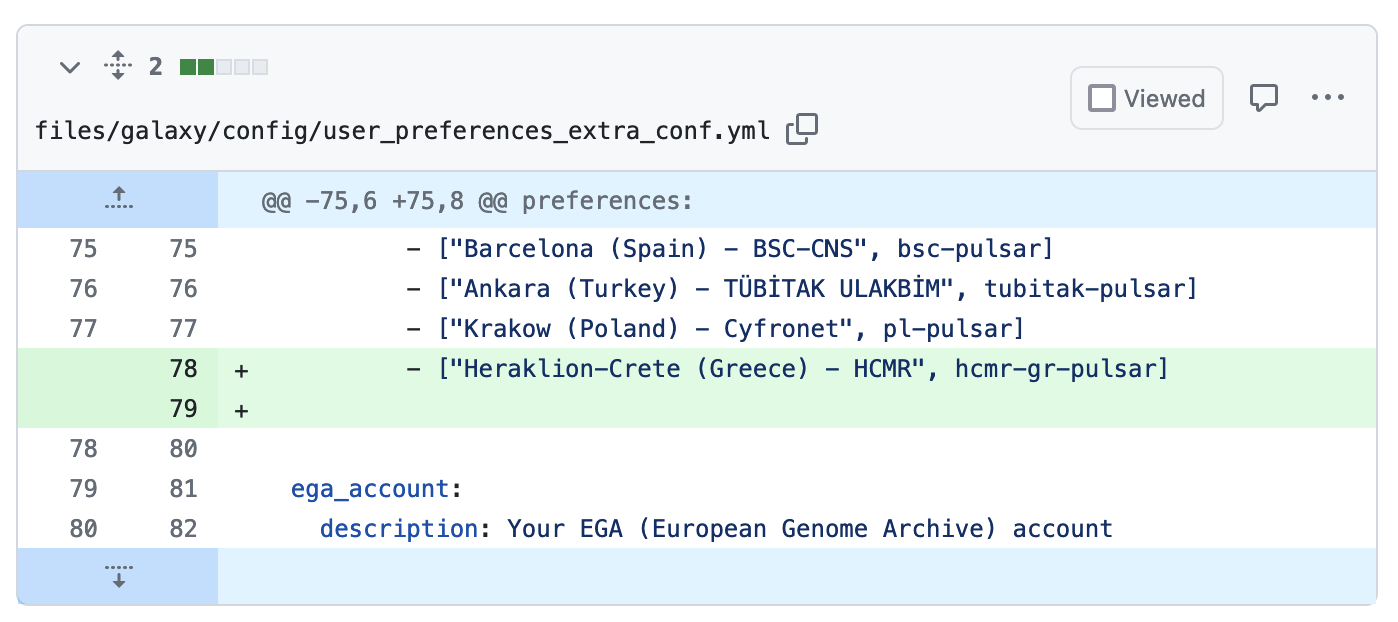
First of all we need to add our (future) new Pulsar endpoint to the list of those available. So edit the YAML file:
vim files/galaxy/config/user_preferences_extra_conf.yml
Navigate to the
distributed_computesection, and add your new endpoint at the end of the section, with a description of the deployment, hereTest Pulsar deployment, followed by its short name,test01-pulsarin this example.For example you can add your site to the bottom of the list in the form
CITY (COUNTRY) - INSTITUTION", SITE_NAME.distributed_compute: description: Use distributed compute resources inputs: - name: remote_resources label: Remote resources id type: select required: False options: - ["default - Galaxy will decide where to put your job", None] ... - ["Test Pulsar deployment", test01-pulsar]
Next to this we need to add a new TPV destination. This file defines our resource limits, and needs a small block of information to add, including what we’re providing as a resource. Edit the YAML file, in the form of a jinja template:
vim files/galaxy/tpv/destinations.yml.j2
Navigate to the
Pulsar destinationssection:####################### # PULSAR DESTINATIONS # ####################### pulsar_default: # use for remote Pulsar nodes and ALWAYS overwrite the runner. ...
and add the new pulsar destination to TPV configuration:
pulsar_test01_tpv:
  inherits: pulsar_default
  runner: pulsar_eu_test01
  max_accepted_cores: 8
  max_accepted_mem: 30
  min_accepted_gpus: 0
  max_accepted_gpus: 0
  scheduling:
    require:
      - test01-pulsar
Name of your queue, in this case
pulsar_test01_tpv, it should end with _tpv. Configure it taking into account the resources you will make available:inherits: this destination always inherits frompulsar_default.runner: this is the name of your destination,pulsar_eu_test01in this case. Since we’re part of Pulsar EU, pulsar_eu_ remains. Then add your institution name, and we prepend our name with 01, because we may add new runners later.max_accepted_cores: the maximum number of cores a job can require to run on this endpoint.max_accepted_mem: the maximum number of GB of RAM a job can require to run on this endpoint.min_accepted_gpus: the minumum number of GPUs a job can require to run on this endpoint.max_accepted_gpus: the maximum number of GPUs a job can require to run on this endpoint.scheduling: the short name you configured in the previous section, in this casetest01-pulsar, as a requirement to our resource definitions, binding the two together.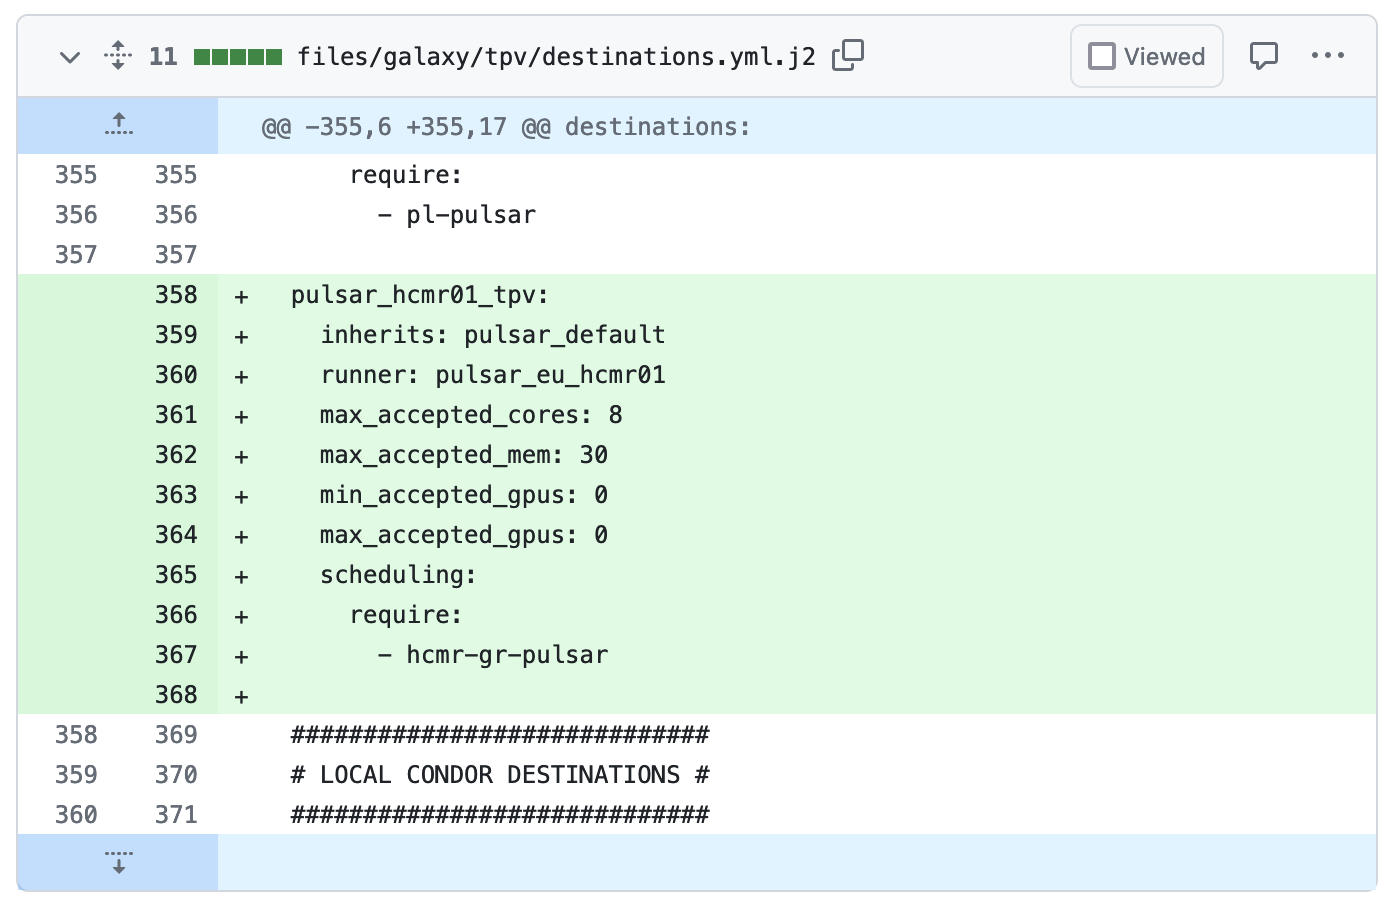
Then we add the user credentials, i.e. RabbitMQ username and password, for the new endpoint to the RabbitMQ list, editing the file:
vim group_vars/mq.yml
Navigate to the
rabbitmq_userssection and add your entry:# RabbitMQ rabbitmq_users: - user: mqadmin password: "{{ rabbitmq_password_admin }}" tags: administrator vhost: / - user: flower password: "{{ rabbitmq_password_flower }}" tags: administrator vhost: galaxy - user: galaxy password: "{{ rabbitmq_password_galaxy }}" vhost: galaxy ... - user: galaxy_test01 password: "{{ rabbitmq_password_galaxy_test01 }}" vhost: /pulsar/galaxy_test01
In this case, we added a user named
galaxy_test01, a password in the form of a jinja2 variable{{ rabbitmq_password_galaxy_test01 }}and a virtual host/pulsar/galaxy_test01.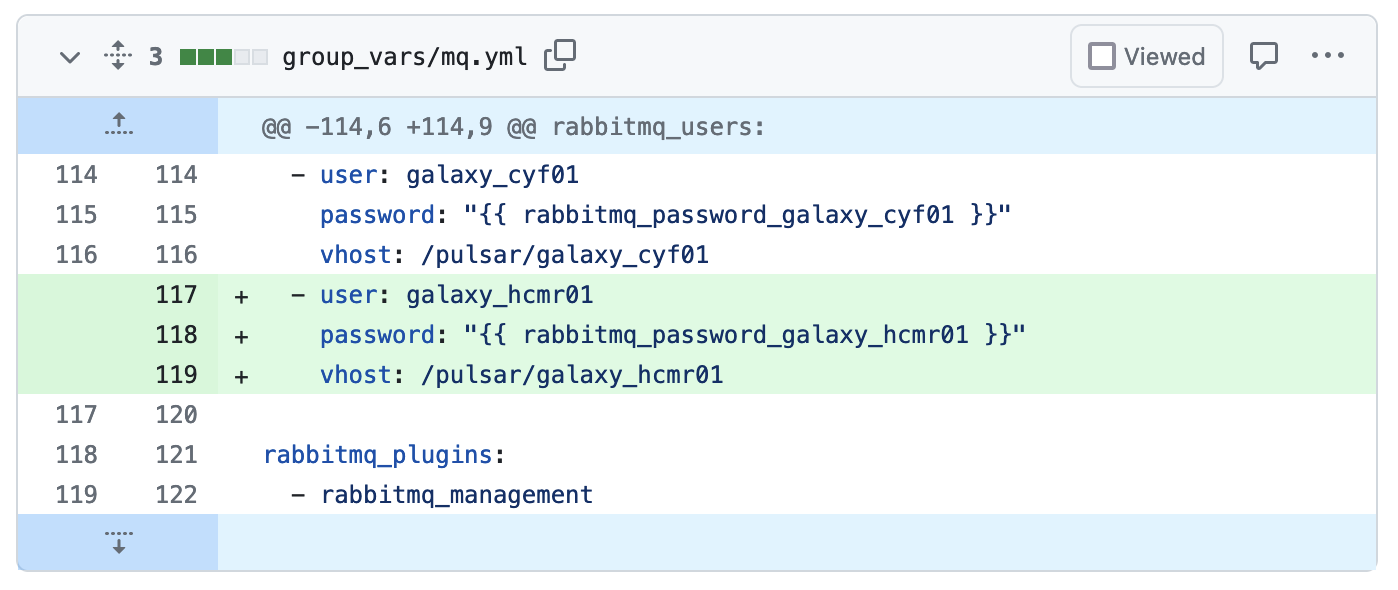
Finally, we need to add the new destination to the (use)Galaxy job configuration file:
vim templates/galaxy/config/job_conf.yml
and modify the
galaxy_jobconfsection:galaxy_jobconf: plugin_workers: 8 handlers: count: "{{ galaxy_systemd_handlers }}" assign_with: db-skip-locked max_grab: 16 ready_window_size: 32 plugins: ...
adding your endpoint configuration
...
- id: pulsar_eu_test01
  load: galaxy.jobs.runners.pulsar:PulsarMQJobRunner
  params:
    amqp_url: "pyamqp://galaxy_test01:{{ rabbitmq_password_galaxy_hcmr01 }}@mq.galaxyproject.eu:5671//pulsar/galaxy_test01?ssl=1"
    galaxy_url: "https://usegalaxy.eu"
    manager: production
    amqp_acknowledge: "true"
    amqp_ack_republish_time: 300
    amqp_consumer_timeout: 2.0
    amqp_publish_retry: "true"
    amqp_publish_retry_max_retries: 60
where:
id: is the name of the destiantion, in this casepulsar_eu_test01
amqp_url, is the RabbitMQ url, customized with the username and password. The queue URL will looks like this:pyamqp://galaxy_test01:*****@mq.galaxyproject.eu:5671//pulsar/galaxy_test01?ssl=1 .. figure:: _static/img/HCMR_pulsar_jobconf.png :scale: 40% :align: center
Push them to the forked repository:
Changes not staged for commit:
(use "git add <file>..." to update what will be committed)
(use "git restore <file>..." to discard changes in working directory)
   modified:   files/galaxy/config/user_preferences_extra_conf.yml
   modified:   files/galaxy/tpv/destinations.yml.j2
   modified:   group_vars/mq.yml
   modified:   templates/galaxy/config/job_conf.yml
$ git add files/galaxy/config/user_preferences_extra_conf.yml files/galaxy/tpv/destinations.yml.j2 group_vars/mq.yml templates/galaxy/config/job_conf.yml

$ git commit -m "add test deployment"
[master c8bd1dbd] add test deployment
 4 files changed, 29 insertions(+), 3 deletions(-)

$ git push
Enumerating objects: 26, done.
Counting objects: 100% (26/26), done.
Delta compression using up to 2 threads
Compressing objects: 100% (13/13), done.
Writing objects: 100% (14/14), 1.68 KiB | 858.00 KiB/s, done.
Total 14 (delta 10), reused 0 (delta 0), pack-reused 0
remote: Resolving deltas: 100% (10/10), completed with 10 local objects.
To github.com:mtangaro/infrastructure-playbook.git
   db718db4..c8bd1dbd  master -> master
An example pull request can be found here and it looks like as the following:

The secret_group_vars/pulsar.yml is edited by the usegalaxy-eu admin team, adding the RabbitMQ password.
Resources on the Net
UseGalaxy.eu Terraform recipes for Pulsar Endpoint - GitHub
UseGalaxy.eu Infrastructure Playbook - GitHub
AlmaLinux - Homepage
Terraform Installation Guide - HashiCorp
Terraform OpenStack Provider Reference - HashiCorp
Terraform runs failing with “x509: certificate signed by unknown authority” error - HashiCorp
Bring your own compute
From the top-left User menu, navigate to User -> Preferences -> Manage Information panel.
Here is possible to add Pulsar details to get your RabbitMQ credentials in the section:
Bring your own Pulsar endpoint to Galaxy. You can add here your Pulsar credentials and specifications.
After 24 hours Galaxy's job scheduling systems will take your Pulsar into account and schedule appropriate jobs to your compute resources.
This is an experimental feature. Contact us if you want to learn more about it.
Fill it taking into account your Pulsar endpoint specs:
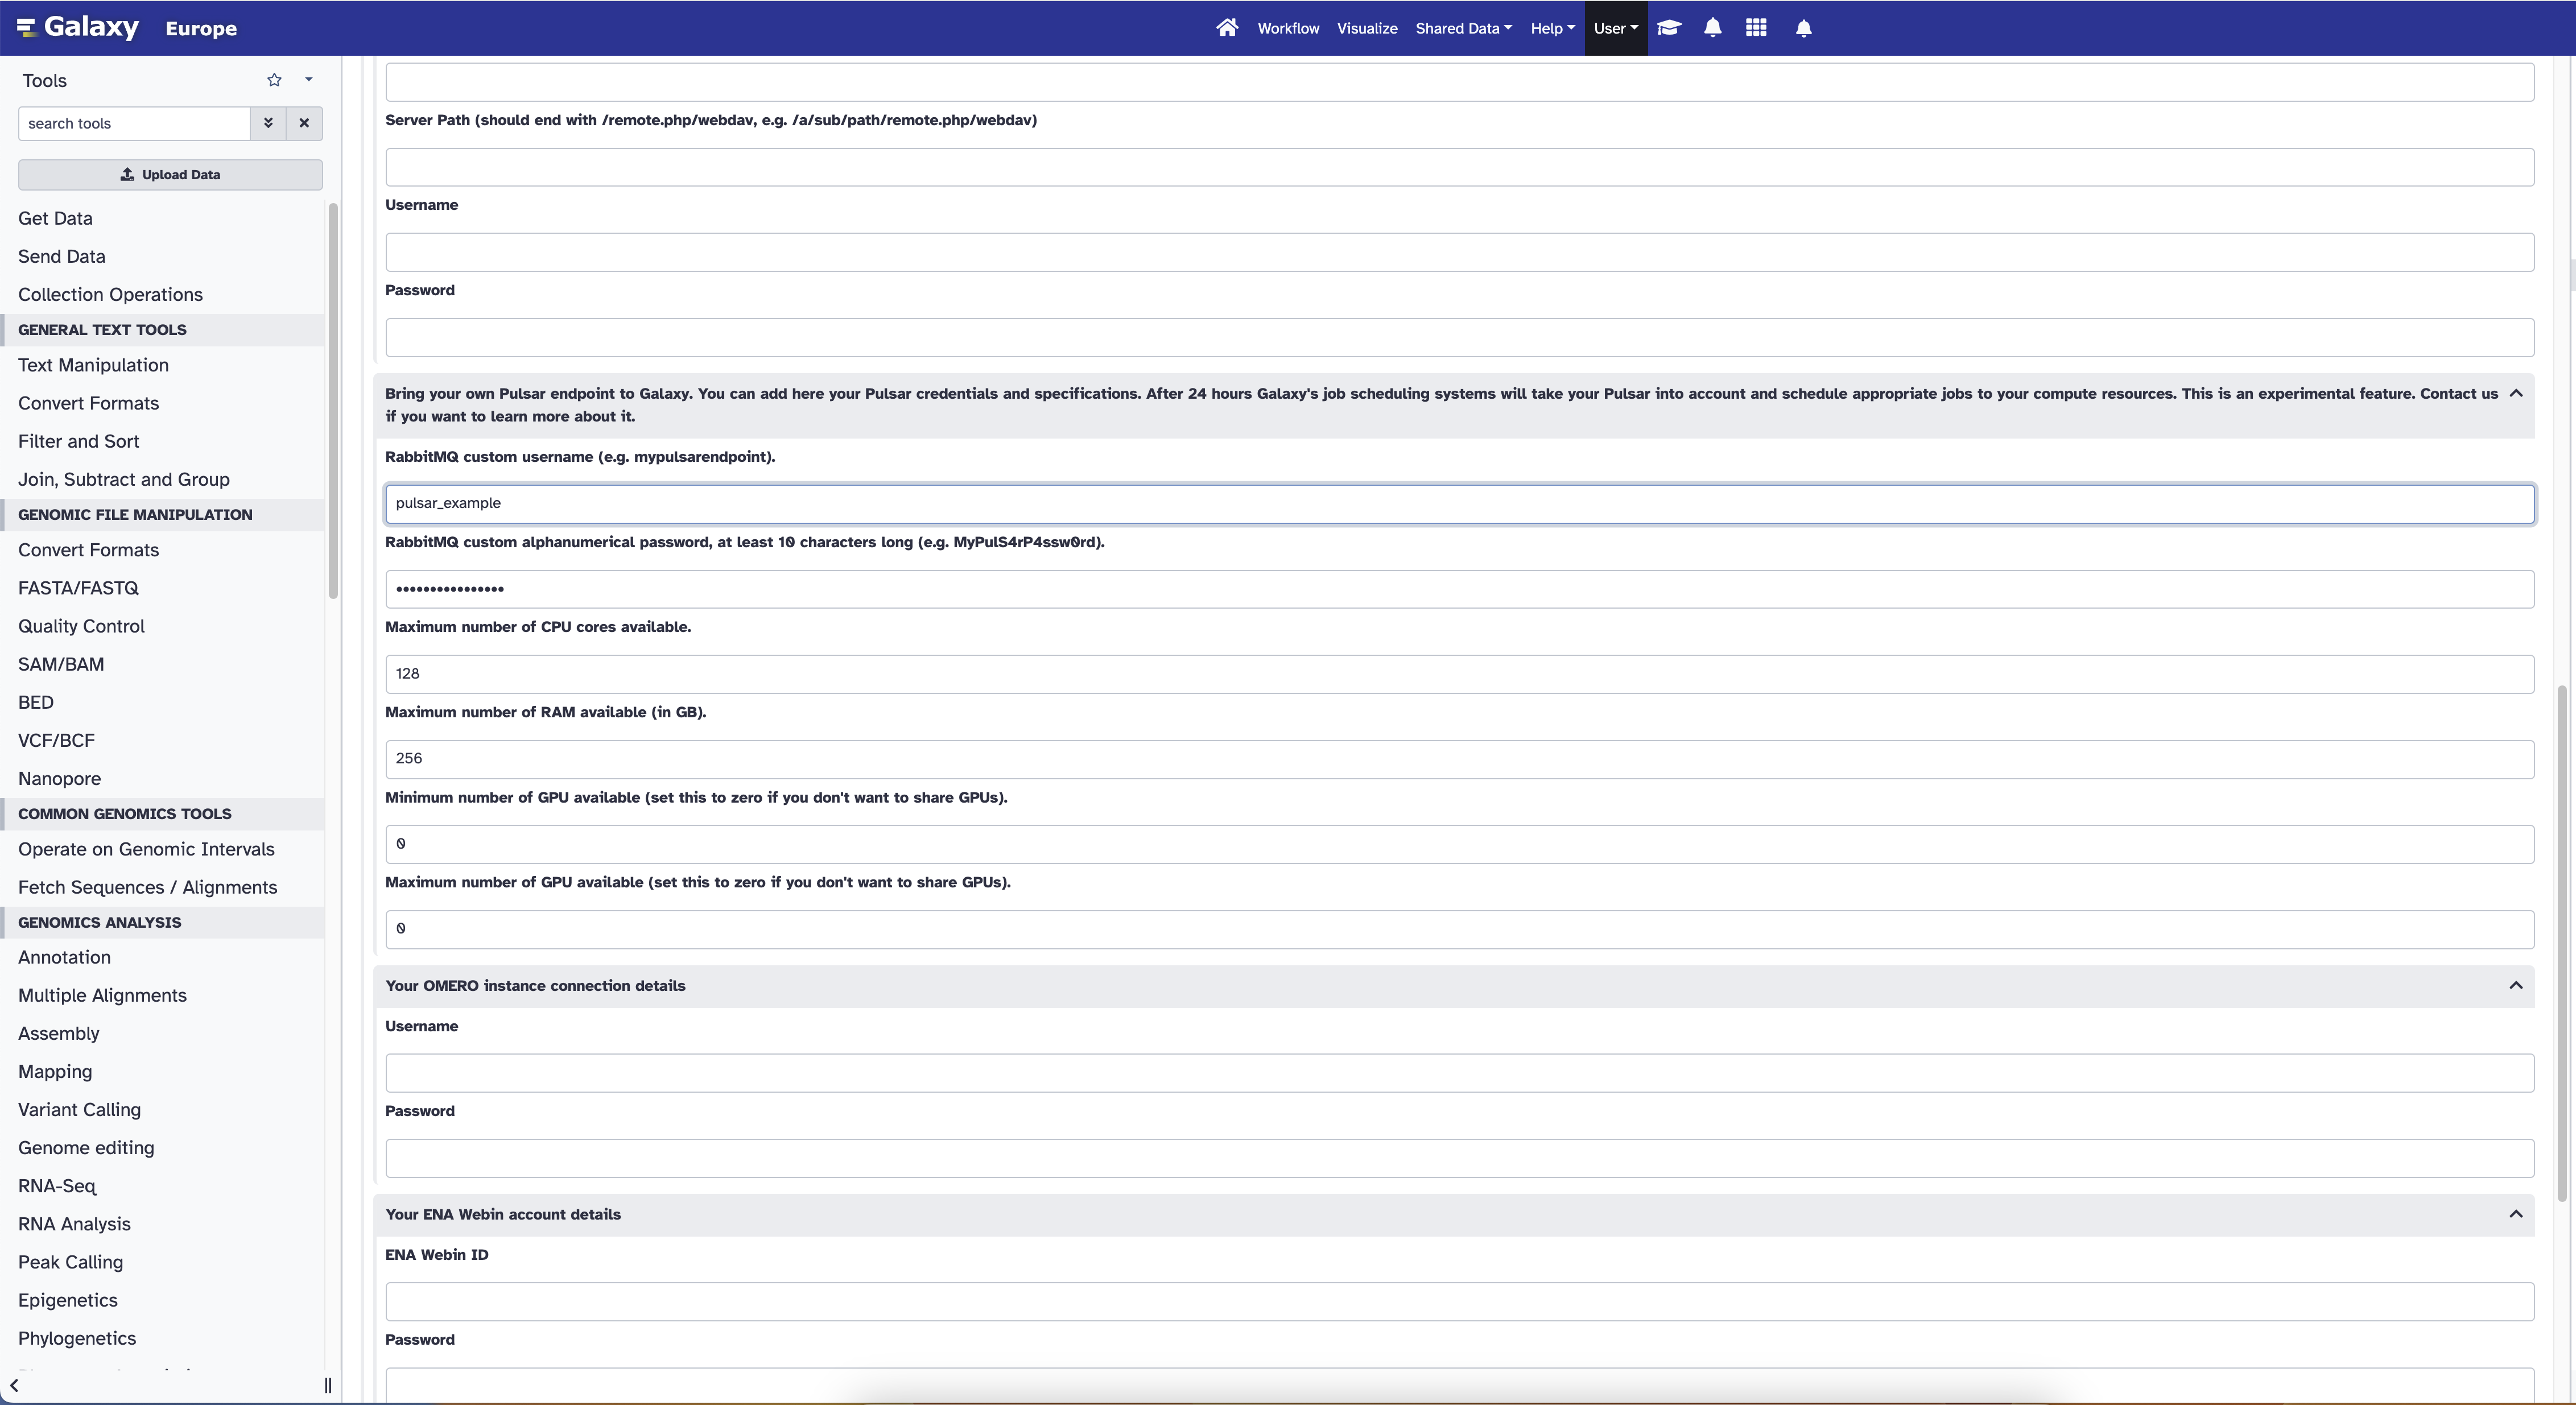
The UseGalaxy.eu team will provide you the RabbitMQ queue URL by mail, which needs to be added to your Pulsar configuration as described in the next step.